Azure + Silverlight 4 + RIA Services + MVC2 (Part 5)
by Peter Daukintis
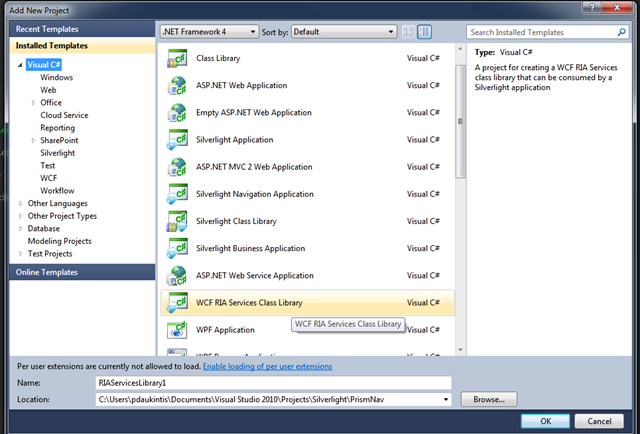
To illustrate how the final architecture hangs together I will take the AudioModule PRISM module from the previous post and link it up with a RIA services class library running on the server. So, the first step is to add a RIA Services class library to the solution:
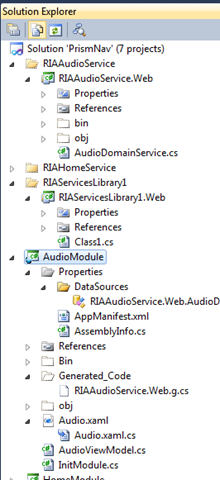
This step will create two new sub-projects – one for the client – and one for the server. I won’t be using the client library so will delete it and use the AudioModule in its place. So I have removed the project without the .Web suffix. Also, I will delete the default Class.cs that comes with the server-side library project. Then the next step is to add a Domain Service Class to the project using the right-click Add New Item menu. I called this AudioDomainContext to match up with the client-side PRISM module.
    [EnableClientAccess()]
    public class AudioDomainService : DomainService
    {
    }
This is the empty class that the wizard creates for you – since I don’t want to use any of the pre-built domain context’s such as the ones provided for Linq2Sql or Entity framework. Ultimately, I want to use Azure Table storage for this walkthrough but it’s nice to know that I have the flexibility to mix and match these. For this part in the series I am going to make a dummy data layer but for my overall architecture just imagine that I could use the TestEntityRepository behind the ITestEntityRepository from the second post in this series. So, here’s the code for the AudioDomainService:
    [EnableClientAccess()]
    public class AudioDomainService : DomainService
    {
        public IQueryable<AudioEntity> GetAudio()
        {
            var audioEntities = new List<AudioEntity> {new AudioEntity { Id = 1, Title = "Title1", Artist = "Artist1"}};
            return audioEntities.AsQueryable();
        }
    }

    [MetadataType(typeof(AudioEntityMetadata))]
    public class AudioEntity
    {
        public int Id { get; set; }
        public string Title { get; set; }
        public string Artist { get; set; }
    }

    public class AudioEntityMetadata
    {
        [Key]
        public int Id { get; set; }
        public string Title { get; set; }
        public string Artist { get; set; }
    }
First notice I have just new’ed up a list of AudioEntity instances to act as my dummy data layer in this case (for the purpose of this demonstration it doesn’t really matter). The EnableClientAccess attribute on the class marks it as a class to use to generate the client-side code from. The RA Services code generation layer knows from inspecting the methods here that return IQueryable what are the entities and methods to transfer over to the client. You can add any methods you like in here and those returning IQueryable will later magically appear on your client.
Also the entity has a ‘buddy class’ used to define it’s metadata. This is achieved by marking up the properties with attributes. The buddy class is only necessary if the entity is actually generated externally by, for example, Linq2Sql. This method is used as you can’t mark up the generated code as you will lose your attributes each time you regenerate. So, in my case I could have just marked the AudioEntity class with attributes but I have used this to illustrate the difference.
So, this leaves one more step to link client and server.
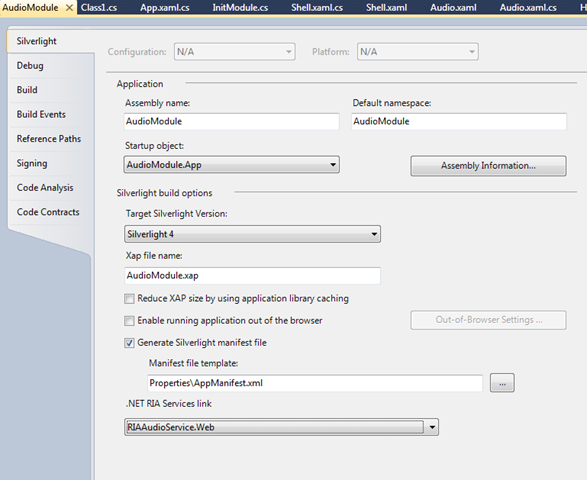
In the Project settings for the AudioModule PRISM module:
At the bottom, there is a dropdown box called .NET RIA Services link and strangely this will have no options in it. In order to edit the link it is currently necessary to edit the project file by hand and find the following tag and type in it’s value:
<LinkedServerProject>..RIAAudioService.WebRIAAudioService.Web.csproj</LinkedServerProject>
Now, the next time you open the project properties it will be set up correctly to point to the server-side RIA services class library project. Now, when you build the solution the client-side code part of RIA services will get generated.
In order to see the code you need to select ‘Show All Files’ at the top of the Solution Explorer and you will see a Generated_Code folder and the generated code will be in there with a suffux .Web.g.cs.
When you try to build this you will find some missing references – here’s the list of references you will need to add:
- System.Windows.Ria
- System.Runtime.Serialization
- System.ServiceModel
- System.ComponentModel.DataAnnotations </ul>
Now of course, you are enabled to use the client-side parts of RIA services.
Client-side
The first thing I can do is write some code like the following:
using System;
using System.Windows.Ria;
using RIAAudioService.Web;

namespace AudioModule
{
    public class AudioViewModel
    {
        public AudioViewModel()
        {
            var audioDomainContext = new AudioDomainContext();
            EntityQuery<AudioEntity> entityQuery = audioDomainContext.GetAudioQuery();

            audioDomainContext.Load(entityQuery, new Action<LoadOperation<AudioEntity>>(LoadComplete), null);
        }

        private void LoadComplete(LoadOperation<AudioEntity> obj)
        {

        }
    }
}
If you are not familiar with MVVM I would recommend you watch this video http://blog.lab49.com/archives/2650 by Jason Dolinger which is a very good introduction to the subject. In brief, the class is a ViewModel which provides properties which the xaml view will bind directly to. So, notice that we can use our entity that was defined on the server and we can asynchronously load our data.
There are a few other aspects to cover here; tooling support in VS2010 and server-defined validation – I will give a quick lowdown here but won’t go into too much detail.
The server-defined validation uses Data Annotations and you simply mark up the entity classes on the server and this metadata flows across to the client and can be used in client-side validation. See http://babaandthepigman.spaces.live.com/blog/cns!4F1B7368284539E5!167.entry?&_c02_vws=1&wa=wsignin1.0&sa=613584902 or http://msdn.microsoft.com/en-us/magazine/dd695920.aspx for further details about Data Annotations.
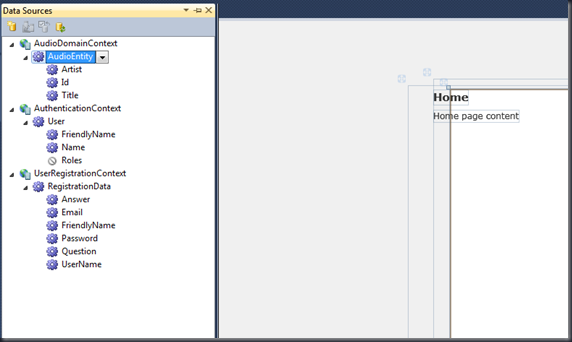
In visual studio 2010 go to Data > Show Data Sources from the main menu. This will open up a panel with your data sources in like the following:
These items can be manipulated and dragged out onto the designer surface to automatically create user interface elements. This doesn’t really fit with the architecture I have been trying to create as I want everything to be separate and this move will somewhat shackle the view to the data layer. However, may be useful in smaller apps and for rapid development scenarios. See here for a good video introducing vs2010 tooling support http://www.silverlight.net/learn/videos/silverlight-4-beta-videos/ria-services-support-visual-studio-2010/.
And that’s the end; I hope you enjoyed these posts! I’m pleasantly satisfied with the end result and did not expect it to be so straightforward and flexible.
Technorati Tags: Azure,AudioModule,PRISM,module,library,server,Class,Domain,Service,menu,AudioDomainContext,AudioDomainService,DomainService,context,framework,storage,series,data,TestEntityRepository,ITestEntityRepository,code,IQueryable,List,Title,Artist,AsQueryable,MetadataType,AudioEntityMetadata,purpose,demonstration,marks,generation,buddy,example,method,difference,Project,bottom,LinkedServerProject,RIAAudioService,Files,Explorer,Generated_Code,folder,System,Runtime,Serialization,ServiceModel,ComponentModel,DataAnnotations,AudioViewModel,EntityQuery,GetAudioQuery,Load,Action,LoadOperation,LoadComplete,MVVM,Jason,Dolinger,introduction,subject,ViewModel,validation,Annotations,classes,spaces,magazine,studio,panel,items,user,interface,development,result,instances,methods,options,references,aspects,metadata,blogWindows Live Tags: Azure,AudioModule,PRISM,module,library,server,Class,Domain,Service,menu,AudioDomainContext,AudioDomainService,DomainService,context,framework,storage,series,data,TestEntityRepository,ITestEntityRepository,code,IQueryable,List,Title,Artist,AsQueryable,MetadataType,AudioEntityMetadata,purpose,demonstration,marks,generation,buddy,example,method,difference,Project,bottom,LinkedServerProject,RIAAudioService,Files,Explorer,Generated_Code,folder,System,Runtime,Serialization,ServiceModel,ComponentModel,DataAnnotations,AudioViewModel,EntityQuery,GetAudioQuery,Load,Action,LoadOperation,LoadComplete,MVVM,Jason,Dolinger,introduction,subject,ViewModel,validation,Annotations,classes,spaces,magazine,studio,panel,items,user,interface,development,result,instances,methods,options,references,aspects,metadata,blog </div>



Comments